Showing posts with label spices. Show all posts

Thursday, July 25, 2013

Spicy Turkey Burgers

A while back, Cody and I were trying to cut back on red meat, so I put together a spicy turkey burger that will knock your socks off. These are also great left-overs! It's one of Cody's favorite original recipes that I've created, so check it out! You'll like the way you cook...I guarantee it!

Ingredients
About 1.2 lbs ground turkey
1/2 container button mushrooms
3 cloves garlic, minced
1/2 onion
1 green bell pepper, diced
1-2 jalapenos
1 egg
1 Tbsp barbecue sauce
1 Tbsp ketchup
about 8 oz pepper jack cheese grated
1/3 c bread crumbs
1 tsp red pepper flakes
1 tsp garlic powder
1 tsp Italian seasoning 

Cook the onion and garlic on medium high heat.
While the onion cooks, dice the green bell pepper.
Dice the mushrooms.
Once chopped, add each ingredient.
Cook for about 10-15 minutes until vegetables are soft.
Dice the jalapeno. I use a plastic bag so that my hand does
not burn. I'm just so delicate... 
Add jalapeno(s). I only used one here.
Cook for another 5 minutes.
While the mix is cooking combine the egg, barbecue sauce, ketchup, red
pepper flakes, Italian seasoning, and garlic powder.
Mix it up! If you want super spicy, you can add a tsp of cayenne pepper.
Add in the turkey, and mix it with a fork.
Once cool, add the vegetable mix. You may not use it all. I use about 1/3 cup.
Add bread crumb. If needed, add extra so that the mix is not too wet.

Grate and add the cheese
Shape into burger patties. I usually make 6 to 8.
I don't have a grill, so I use my grill pan. OIL the pan. Because of the cheese,
the burgers will stick, so oil it! Cook about 5 minutes on each side.
While cooking, you may want to cover with a lid. This will help cook the turkey
and help them not to stick. Remember turkey must be cook through. No rare here!
165 degrees internal temperature!
Yum! Any crispy part tastes like crunchy cheese! 
Delicious! Seriously try this one!


God bless you and your food!

Monday, July 15, 2013

Sweet Potato Hash


Sweet potato hash is always a "round two" meal for us. If I have any left over meat that needs using, I usually turn it into hash. The best one I ever made was with leftover chicken, steak, and pork tenderloin. Yummy. The one here, I only had steak to use...still delicious.


Ingredients
Steak (chicken, pork)
   1 onion, diced
   3 cloves garlic
   3/4 cup carrots
   2 sweet potatoes
   1 bell pepper, diced
   1/2 mushrooms
   1 Tbsp italian seasoning
   1 tsp garlic powder
   1 tsp ground sage
   1 tsp fresh sage (optional)


1 tsp fresh basil (optional)
salt and pepper to taste


Add 1 Tbsp oil to a pan on medium-high heat. Add onion and garlic; cook for about 4 minutes. Add the carrot and sweet potato. Cook for 20-30 minutes until the sweet potato gets golden brown on some edges.

Add in the mushrooms and green pepper. Cook until the mushrooms are soft, about 5-7 minutes. Add in the steak and cook about 3 minutes. Add in fresh herbs at the end.


Hope that you try this one because it is quite tasty!

God bless you and your food!

Friday, July 5, 2013

Homemade Croutons

Homemade Croutons

You like croutons on your salad or just to snack on? Make 'em yourself!
 Ingredients
2 Bread slices
Garlic powder
Italian seasoning
Onion powder
Red pepper flakes
Salt and Pepper
Olive Oil


Directions
Cut the bread into 1 inch squares. Sprinkle with about 1 tsp of eat seasoning/spice. YOu can experiment to see what proportions you like best. Drizzle with olive oil. Mix together. Cook at 350 degrees for about 10-15 minutes or until browned. Half way through cook time, mix the croutons around.

Tuesday, August 2, 2011

Easy Chicken Rub

If you have no time to marinade, here is a quick rub to apply to chicken before you grill or cook in a pan:

1 tablespoon chili powder
1 tablespoon paprika
1 tablespoon garlic powder
1 tablespoon onion powder
1 tablespoon crushed red pepper
1 tablespoon pepper
1 tablespoon salt
1 tablespoon cumin
1 teaspoon cayenne pepper
Olive oil

Mix in a bowl.  Drizzle chicken in olive oil, then coat chicken in rub.  You may need more or less rub, depending on the amount of chicken you are cooking. If so, increase or reduce the amount of each spice proportionally.

Wednesday, March 30, 2011

Chicken Tikka Masala

This is a Cody cameo.  I've made Chicken Tikka Masala several times and Deb is a big fan.

Ingredients:

The Chicken
6 boneless chicken breasts
4 teaspoons ground cumin
2 teaspoons garam masala
2 teaspoons cayenne pepper
4 teaspoons black pepper
2 cups plain yogurt
2 tablespoons lemon juice

The Sauce
2 tablespoons butter
2 cloves of garlic
2 jalapeno peppers
4 teaspoons cumin
4 teaspoons paprika
1 teaspoon garam masala
1/2 teaspoon cinnamon
16 ounces tomato sauce
1 cup heavy cream
1 cup 2% milk
1 teaspoon fresh cilantro

Rice
Any plain white, brown, or basmati rice


First, cube the chicken breasts.  I like to make them various sizes.  No larger than an inch though.  Then put all the chicken in a large bowl.  Clean up everything that the chicken touched before progressing.  Salmonella is bad.  Now, add the 4 teaspoons cumin, 4 teaspoons black pepper, 2 teaspoons cayenne pepper, 2 teaspoons garam masala, 2 cups plain yogurt, and 2 tablespoons lemon juice.  Don't worry, the cayenne pepper will be mellowed out by the rest of the ingredients.  Mix everything up with your hands.  Put the bowl in the refrigerator for at least an hour.  The longer the better.  Pictured above is the chicken in the yogurt marinade, along with many of the ingredients used in the recipe.

Now, the sauce.  Put a nice size pot on the stove burner.  Drop 2 tablespoons of butter in and heat it at around 3-4.  Chop up the 2 cloves of garlic and 2 jalapeno peppers as fine as you can.  Then dump these into the pot with the melted butter to saute.


Add 4 teaspoons of cumin, 4 teaspoons of paprika, 1 teaspoon of garam masala, and 1/2 teaspoon of cinnamon.  You can add salt here if you wish.  Let the garlic and jalapeno cook, stirring occasionally, for a couple minutes.  Then add the 16 ounces of tomato sauce, 1 cup of heavy cream, and 1 cup of 2% milk.  Stir.  This is the completed sauce.  Let it simmer for at least 20 minutes, stirring occasionally.

I prefer to serve the masala over rice.  If you're willing to splurge, basmati rice is ideal, but any plain old white rice or brown rice is fine.  Start the rice now, if you are going to serve the masala over rice, a scrumptious combination.


While the sauce is cooking, start the chicken.  The preferred method is to put the chicken cubes on skewers and cook them on the grill.  If you don't have a grill, the next preferred method is a grill pan, skillet, or any old pan on the stove top.  Important:  if you aren't grilling the chicken, strain off the excess yogurt marinade.  Do not just dump the bowl of chicken, marinade and all, into the pan.  Put some oil in the pan or spray it with non-stick if needed.  Heat the pan on high, add the chicken, and cook until done.  The small pieces shouldn't take too long, but since the pan is probably pretty crowded, it may take 10-15 minutes.  Test a piece to make sure it's done, whether from the grill or a pan.  Undercooked chicken is bad.


No grills allowed at our apartment complex.  This isn't all the chicken.  I'd already added some to the sauce before I remembered to take a picture.

Once the chicken is done, and the sauce has simmered for at least 20 minutes, preferably 30, add the chicken to the sauce.  Let the chicken and sauce cook together on low for at least 10 minutes.

To serve, put a bed of rice down in a bowl then ladle the masala over the rice.  Delightful.


Deb made some Naan bread to go with the Chicken Tikka Masala and rice.  Bread is nice to soak up the extra sauce.  This is the completed dish.  Holler!

Sunday, November 21, 2010

Chicken Enchiladas

This chicken enchilada recipe comes from Tyler Florence. Usually when I look for recipes online, I try to find ones that are rated by lots of people, yet they still have high ratings overall. These enchiladas hit the spot. They come out spicy with lots of flavor.
Because a lot of the ingredients come in cans or can be frozen, this recipe is relatively easy to make into a go-to recipe. Despite the canned ingredients, at the end the enchiladas taste amazing, and leftovers are just as tasty.   
First, I let the green chilies drain while I cut up other ingredients and get the chicken cooking.
After letting the oil heat up for a few minutes, I salt and pepper the chicken, and then I put them in the skillet. I recently bought a cast iron skillet, and this was the first time I used it with this recipe. From now on, I'll probably continue to use it because it distributes the heat well, and nothing really sticks to it.  
Once the chicken is in the pan, I season it with the cumin, garlic powder, and paprika. Instead of a Mexican spice blend, I just use paprika because I usually have that in the pantry. I've even made it without the mexican blend or paprika, and the enchiladas come out tasting the same.   
While the chicken cooks on one side, I chop and mince the onion and garlic.
As for the chipotle chilies, they are usually canned in adobo sauce which tastes like a Mexican bar-b-que sauce. I do not particularly care for that flavor, so I usually rinse the peppers under cool water. As I rinse them, I pull the top off, let the water run in the top, and roll them a bit in order to rinse out the seeds.Once they are seeded and minced, I usually put them in with the green chilies to drain.    

Then, I go back to the chicken. After I flip the chicken, season the second side, and let them cook, I put them in a glass bowl to shred. Two forks usually work best since I am usually ready to shred before they have completely cooled.
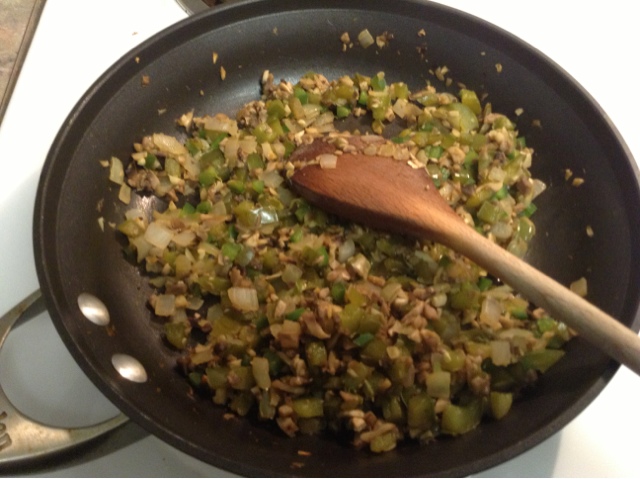
While shredding the chicken, I put the onions and garlic in the chicken drippings to start cooking. I usually let the onions cook a while before I add the garlic so that the garlic does not burn.
  
After the onions and garlic have cooked down, I add the drained peppers.
Then, I add the stewed tomatoes, and I break up the tomatoes with my wooden spoon.

Then, I add the corn and shredded chicken, and I let them cook until everything is combined and warm.
For assembling the enchiladas, I pour the enchilada sauce into a bowl and a little in the baking dish. Working with about 5 tortillas at a time, I first put them in the bowl of sauce. If I let them sit in the sauce for a bit I do not usually microwave them beforehand unless the tortillas are really stiff. 

I pull out one tortilla at a time and put it in the baking dish. I do not usually fill them in my hand for two reasons: the filling is hot and the tortillas tend to tear. Then I spoon in the filling.
Once the filling is in, I carefully roll it and move it into place.
Getting the enchiladas into the corner without tearing the tortilla can be tricky. Placing the tortilla down first and rolling it a bit at a time helps me get it in place.
When all of the enchiladas are in the pan, I pour a bit more sauce over the top.
Finally, I cover then with cheese! Yumkins.
Every time I have made these enchiladas, I have had left-over filling. I usually do one of two things: make more enchiladas to freeze or save the filling to use as a topping for nachos. Either way left-overs from these enchiladas are just as tasty as the first go around.
After 15 minutes at 350 degrees, the cheese is melty, and we are ready to eat!  
I always serve the enchiladas with re-fried beans, and I always think about making Mexican rice (maybe next time).
These enchiladas are delicious, and I hope you try making them. Remember this recipe makes a lot, so if you need to, you can cut it down. Luckily, they freeze very well, so by cooking once, I always have an easy, tasty meal in the freezer for another night. Try it; you'll like it!

God bless you and your food!