Sunday, November 21, 2010

Chicken Enchiladas

This chicken enchilada recipe comes from Tyler Florence. Usually when I look for recipes online, I try to find ones that are rated by lots of people, yet they still have high ratings overall. These enchiladas hit the spot. They come out spicy with lots of flavor.
Because a lot of the ingredients come in cans or can be frozen, this recipe is relatively easy to make into a go-to recipe. Despite the canned ingredients, at the end the enchiladas taste amazing, and leftovers are just as tasty.   
First, I let the green chilies drain while I cut up other ingredients and get the chicken cooking.
After letting the oil heat up for a few minutes, I salt and pepper the chicken, and then I put them in the skillet. I recently bought a cast iron skillet, and this was the first time I used it with this recipe. From now on, I'll probably continue to use it because it distributes the heat well, and nothing really sticks to it.  
Once the chicken is in the pan, I season it with the cumin, garlic powder, and paprika. Instead of a Mexican spice blend, I just use paprika because I usually have that in the pantry. I've even made it without the mexican blend or paprika, and the enchiladas come out tasting the same.   
While the chicken cooks on one side, I chop and mince the onion and garlic.
As for the chipotle chilies, they are usually canned in adobo sauce which tastes like a Mexican bar-b-que sauce. I do not particularly care for that flavor, so I usually rinse the peppers under cool water. As I rinse them, I pull the top off, let the water run in the top, and roll them a bit in order to rinse out the seeds.Once they are seeded and minced, I usually put them in with the green chilies to drain.    

Then, I go back to the chicken. After I flip the chicken, season the second side, and let them cook, I put them in a glass bowl to shred. Two forks usually work best since I am usually ready to shred before they have completely cooled.
While shredding the chicken, I put the onions and garlic in the chicken drippings to start cooking. I usually let the onions cook a while before I add the garlic so that the garlic does not burn.
  
After the onions and garlic have cooked down, I add the drained peppers.
Then, I add the stewed tomatoes, and I break up the tomatoes with my wooden spoon.

Then, I add the corn and shredded chicken, and I let them cook until everything is combined and warm.
For assembling the enchiladas, I pour the enchilada sauce into a bowl and a little in the baking dish. Working with about 5 tortillas at a time, I first put them in the bowl of sauce. If I let them sit in the sauce for a bit I do not usually microwave them beforehand unless the tortillas are really stiff. 

I pull out one tortilla at a time and put it in the baking dish. I do not usually fill them in my hand for two reasons: the filling is hot and the tortillas tend to tear. Then I spoon in the filling.
Once the filling is in, I carefully roll it and move it into place.
Getting the enchiladas into the corner without tearing the tortilla can be tricky. Placing the tortilla down first and rolling it a bit at a time helps me get it in place.
When all of the enchiladas are in the pan, I pour a bit more sauce over the top.
Finally, I cover then with cheese! Yumkins.
Every time I have made these enchiladas, I have had left-over filling. I usually do one of two things: make more enchiladas to freeze or save the filling to use as a topping for nachos. Either way left-overs from these enchiladas are just as tasty as the first go around.
After 15 minutes at 350 degrees, the cheese is melty, and we are ready to eat!  
I always serve the enchiladas with re-fried beans, and I always think about making Mexican rice (maybe next time).
These enchiladas are delicious, and I hope you try making them. Remember this recipe makes a lot, so if you need to, you can cut it down. Luckily, they freeze very well, so by cooking once, I always have an easy, tasty meal in the freezer for another night. Try it; you'll like it!

God bless you and your food!   

Friday, October 22, 2010

I like to try new things: Red Tamarillo

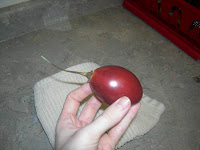
Recently I decided that I was going to try new things, so now when I get everything for dinner, I also like to buy something that I have never tried before. This red tamarillo (also comes in yellow) comes from New Zealand, or so said the sticker from the store. I think it looks like a large football-shaped cherry.
Anyway, at the store it caught my eye, so I had to try it. I was surprised that the seeds on the inside were such a dark purple, almost black, but the color combination on the inside is quite pretty. I'd eat it. 
I figured we should try it raw for the first time, so Cody and I both got spoons to scoop out the flesh. I was expecting sweet, cherry flavor. No, not at all. It tastes almost exactly like a tomato. I did not really care for the raw taste, so I only took a bite. Cody ate his half and finished mine. He said that he thought it was not that bad. 
I found several recipes that cook it down into a topping for ice cream or blend it into a smoothie, so if I buy it again, I definitely will not eat it raw. I am sure some sugar and other flavors would make it more enticing. We shall see! You might want to give this red tamarillo a try especially if you like tomatoes. Needless to say, it is worth a try for something new. Enjoy!


God bless you and your food!

Wednesday, October 20, 2010

Honeymoon Inspiration: Coconut Curry Chicken

For our honeymoon, Cody and I went to Maui, Hawaii. Needless to say, it was spectacular. From sunup to sundown, we soaked it all in--sun, fun, and memories. After long days of exploring and snorkeling, we would either cook dinner together in our condo or go to a local place to try new things. Maui had quite a few restaurants that served either freshly caught fish (since we were in the middle of the ocean) or Asian food (because we were quite close to Japan and China). One night we went to Pho Saigon 808, a Thai restaurant that was recommended in our guidebook.
When we finally found it, I was afraid they were about to close because it was getting late. I told Cody to ask if they would be mad if we ate there. He said it exactly that way, "Would you be mad if we ate here," and the teenage boy smiled and showed us to a booth. This was the first time I had ever had real Thai food, but it will not be the last. Anyway, we ordered fried calamari, two different types of Pho (Vietnamese or Thai soup), and a Thai iced tea. The most memorable thing was definitely the Coconut Curry Chicken Pho. I could drink the curry broth alone; it was that good. 
Once we got back home to the States I knew I  wanted to find a recipe for the Curry Coconut Chicken. After several hours of searching, I found my first recipe inspiration here. I changed a few things, and I add a lot more vegetables to make it more similar to our experience in Hawaii. View my edited recipe below.   
Unlike the recipe I found, I serve the Coconut Curry Chicken over rice (instead of with noodles) from my rice cooker, one of the best kitchen tools. The rice comes out perfect every time, and I do not have to watch it at all. Starting the rice is always how I begin making this tasty meal.


All of the ingredients (except for the chicken...oops.)
Here is a list of everything that I use:
4 cups cooked rice 


2 tablespoons vegetable oil
1 small onion, minced
1 tablespoon minced ginger
1 tablespoon minced lemon grass or pale green cilantro roots (optional, definitely optional)
2 cloves garlic, minced
1 teaspoon dark red chili paste (sambal)
3/4 pound boneless, skinless chicken, thinly sliced 
3 tablespoons curry powder
1/2 teaspoon paprika
1 can (14 ounces) unsweetened coconut milk
1/2 cup half-and-half
4 cups chicken stock (or water and stock base)
2 tablespoons fish sauce (use soy sauce as alternative)
1 tablespoon sugar (optional)

salt and pepper, to taste
green bell pepper (I use green because it is cheapest, but red or yellow is nice for color)
1-2 cups carrots, sliced
1-2 cups snap peas
2-3 heads of broccoli


How I do it:
First, I start out by cooking the onions (see before picture) in the hot oil over medium heat until they are soft (see after picture). The most important part of making this dish is making sure the onions are cooked down well enough so that they are not crunchy. 

before
after

Usually while the onions are cooking, I cut up the chicken, carrots, bell pepper, broccoli, and garlic, and I grate the ginger. The fresh ginger adds so much Asian flavor to the curry, so don't leave it out! Once the onion is cooked down, I add the ginger and garlic to cook for about a minute. Then, I turn up the heat to high so that I can add the chicken. 

chicken added
 
Once the chicken is partially cooked, I add the curry powder and paprika. Then, I add the carrots and broccoli. Those vegetables take some extra time to cook, so I add them now, but it would be okay if you added all the vegetables at the end.

  
Then, I add the coconut milk and half-and-half, and I stir until the curry looks evenly distributed.
Finally, I add the chicken stock, fish sauce, sugar, bell pepper, and snap peas. Usually, I let it all simmer for about 20 minutes so that all of the vegetables can cook, and then all of the flavors come together. Once it has simmered for a while, I always take a spoon and taste the broth. It is amazing every single time! Yum. 

When I serve the coconut curry chicken, I put about half a cup of rice in the bottom of the bowl, and then I load it up with vegetables and top with broth. It is best in a bowl because it's more like a soup after all. :) Cody and I usually end up eating this for a week. I never get tired of it. Hope you try it and enjoy it!

God bless you and your food!    

Saturday, October 9, 2010

Cooking like a Wife


          As I have transitioned from college student to newlywed, my desire to cook well and practically has been growing. My inspiration to cook and my inspirations for special dishes usually come from specific places including my family, my favorite restaurants, my first job, and my memorable travels. Over the years, I have gathered, tweaked, and developed recipes for meals and desserts that almost always put a smile on my family's faces as well as a warmth in their bellies. As I begin this blog, I am considering what to emphasize and how to begin. At the threshold, I have several goals in mind:

     (1) To create a reference and catalog of all my favorite dishes.
     (2) To develop a list of key ingredients to always keep on hand.
     (3) To explain my favorite kitchen tools and gadgets.
     (4) To reminisce on happy memories and sources of inspiration.
     (5) To connect with YOU! 

          I hope you find my blog helpful, inspirational, and tasty! As I sign off my first post of many, I will leave you with a quote from Mr. Robert Frost. He said, "There is one thing more exasperating than a wife who can cook and won't, and that's a wife who can't cook and will." I aim to be neither.

God bless you and your food!